Part 126: Troublesome Trains*
Troublesome Trains*Video
There's a bit in here to demonstrate how the Freeplay planet is impossible to finish, but mostly this is a condensed fraction of the time I spent on the Tutorial level. As it turns out, they are nearly identical except for how one of them mostly works, and the other one doesn't.

We throw the normal Creeper World book out the window here. There are no emitters or Creeper and not most of the other things we are used to seeing. That object at the top of the map is, as far as I can tell, something necessary for the scripting of this map to work. It tried connecting to it without success. And then we've got instructions:


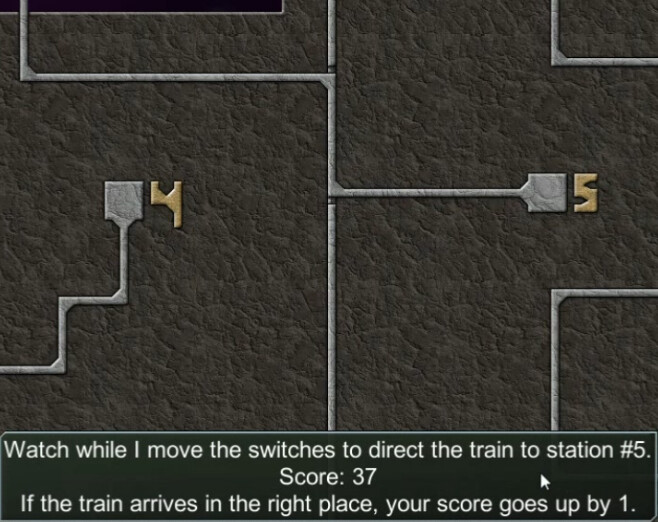
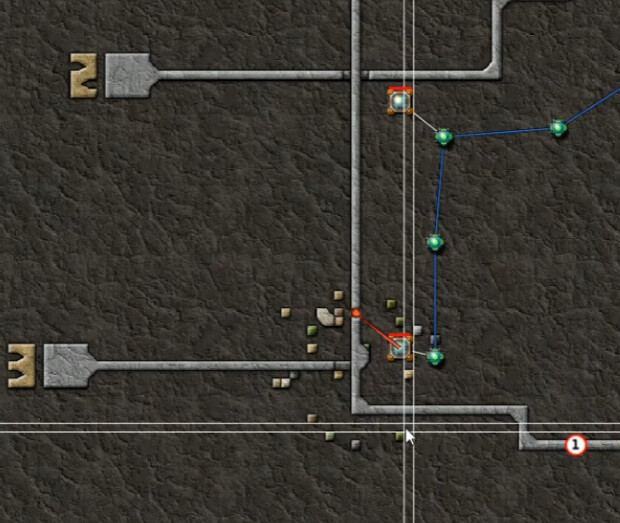
This I really didn't get the first time through. You can see a couple intersections here where one tile of the track has been lowered - didn't take me long to surmise that is what is meant by 'move the switches'. But I didn't see how it was being done exactly.

We can see the train - the circle with a '5' on it - following the 'switches' dutifully and heading to the 'station' marked with a big golden/yellowish 5.

Once it gets there, it 'poofs' and disappears. We can see the score has updated from 37 to 38 in the text here to reflect that success.


5x the penalty for a successful arrival is hefty, but there are other consequences.

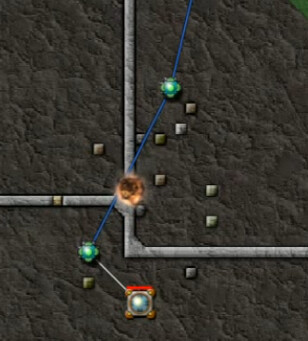
This '1' train is headed in the right direction - but there's an unusable/damaged section of track, i.e. a section not at the proper height of 8, coming up here.

Here's what a derailment looks like. The train is removed - explosively. Pieces of it land nearby, sometimes on the track itself, so they can make a bigger problem of themselves. I would later learn, painfully and repeatedly, just how troublesome these trains could be in this way. As warned, the score has been reduced.

Fix them like what? All I'm treated to here is the damage being removed over the next bit. Several seconds later ...

This led to me clicking on the damaged parts trying to accomplish something and not getting anywhere. The way you're supposed to do it is by building Terps, the normal terraforming CW way - but nothing about this map has been normal CW, nowhere in the tutorial has placing standard CW buildings been done etc., so I was looking for something totally different. Perhaps just being obtuse, but it felt like some unintended misdirection to me.


I initially missed this and didn't know what the winning score was. Also worth noting; you lose when your score goes negative, and this info is in the upper-left, not upper-right. It does mention the terps here, so I would have been less annoyed at the tutorial had I actually read this one.
So here's my initial layout, having eventually figured out what to be doing, and I don't have stuff up in time; I needed more collectors. We are allowed:
** 1 Command Node
** Collectors
** Terps
** Relays
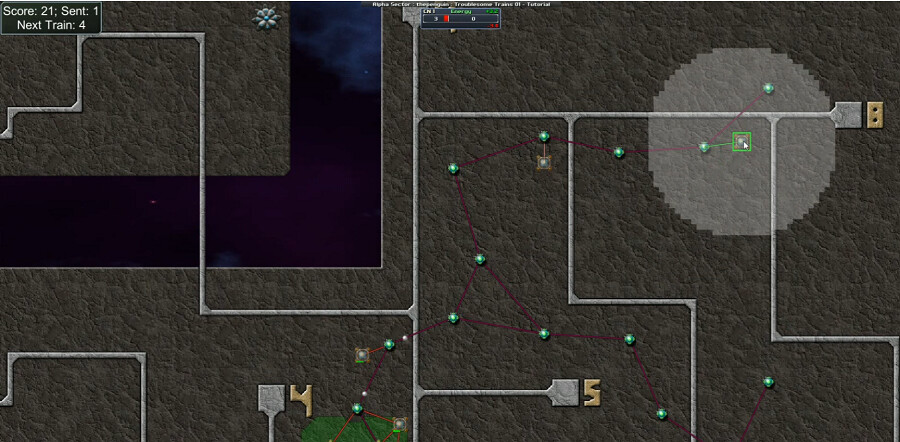
The basic things you need, and nothing else. Interestingly, the Freeplay pointlessly allows Siphons as well, even though it has no resources you can put them on. The general idea, which I would get better at eventually, is to have enough energy and terps at each intersection. I recommend two at each. The Score starts at 20 -- you can see it is 21 here, and it took me a while to identify what happens there but it's a bug in the player's favor. Where it says 'Next Train: 4', that means a new one will be released in 4 seconds. It also says 1 has been Sent ... well no, not really. Instead of Next Train blah blah blah it will at times read Preparing Trains. This is basically a waiting period while some scripting logic is resolved - but sometimes it ends with no train being sent. You get the point for these trains, which are never produced or sent anywhere, automatically. Monopoly would call this a 'bank error in your favor'.

Eventually I do get everything set up, with my score down to 13. This shot is at 6:15 on the video, and I'm trying to force a train down the 3 pathway by blocking off the route upwards - I've lowered that section to 7 elevation instead of the 8 for the train path.
It ... uh ... doesn't work. Badly. I put the switch/block one tile too high, which means by the time the train reaches it, there's no option to just go to the left. They have to be placed precisely: one tile past the intersection. Nowhere else works. I didn't understand that at the time, but I would figure it out soon afterwards. My score bottomed out at 0, but then I started getting some trains routed properly and it climbed a bit.

Didn't last too long though. 9:42 video for this, which is everything blowing up. It's not hard to avoid losing - I would not see this catastrophe again.

Here's the first train we get on the restart. I have a more robust network, and you can see that most of the proper switches to reach the '1' station are in place - there isn't one by the 5, and once again I've just been granted a free point because train-creation bug. I have a basic idea of what I'm doing here though, having finally wrapped my head around the core mechanics of this train-engineer puzzle.

Typically the trains will come in groups, then pause for a while, then more will arrive. It's hard to tell the story of this level in screenshots, but here's a typical early decision. For those wanting more of a 'flow' ... just watch it. Otherwhise I'll try to describe a few things as best I can.
** The 1 is on its way safely.
** To get the 2 home, I need to block off the path to 1 and open (raise to 8) the path to 2.
** For the 5s, I need to open the route that way and close the path further downward before they reach that intersection.
Getting all that done in time, even at the slowish speed they are traveling it, it problematic with only modest mouse skills and the accuracy required; exact precision on both the terrain level and placement for each move is needed, and then you need a bit of time for the terps to do the work. At first it's more common to be able to get all or most of them ... but that changes later.
After this restart, I was in an equilibrium at around 20 on the score for a little while; I'd get most of the trains but not nearly all of them, not enough to make significant progress but I wasn't in danger of losing either, never dropping below the upper-teens.
Eventually I adopted, though I'd change some of them slightly over time, a set of 'standard' or 'optimal' switch settings. For example here, as with 50+ trains having been sent I've cracked 30 points for the first time, let's take a look at the four intersections in view:
** In the lower-left, the main intersection that all trains must go through. Up for 6-9, down for 1-5. That's pretty much a coin-flip, so I was constantly changing that but I eventually went to leaving both routes open, and closing one of them as needed.
** The path to the 9 is only needed when we have a 9 train - 6,7, and 8 all go to the right. As a matter of probability, it's best to default that to closed so we don't need to change it nearly as often.
** Next to the right is the path that leads down to 6. Usually I'd have that closed instead of open here, and open the path to the right since two others - 7 and 8 - go that way.
** On the far right is another coin-flip; to the right for station 8, down for station 7.
And so on. Getting used to this kind of logic was more or less the next step in getting better at this level. Making less changes in general means more time allowed for the ones you do need to make, and a smaller chance in the aggregate of making a costly, derailment-causing error.
Not long after, an example of the kind of cascade failure/domino effect that can happen. A crash down here near the station 3 turn-off, and you can see an unfortunate bulge to the right of the track. The next 1-train decided to go that way ... and crashed again. Much mess created, much score lost, much frustration had.
The best solution I found in crash situations is just to route EVERYTHING in the opposite direction, and clean things up as quickly as possible. That means most of them will end up going to the wrong stations and you'll lose points, but it stops the bleeding and normal operations can resume once the cleanup is finished.
Once I reached 50 points, I stopped and did a bit of googling to find out how high I had to get. Never found the answer that way, but I did discover the whole thing with the Freeplay level not working. So at this point (22:30 - 24:30 approx. on the video) I include a bit of the diversion there. The problem with that second level is that your score never changes. NEVER. Derail, go to the wrong station, right station, whatever, nothing you do matters so you'll never win, never lose, and will be stuck at 20 no matter how long you play it. Obviously that's pointless. In all important particulars the map is otherwhise identical to the Tutorial one. Having read the final instruction text I had missed before, discovering that I needed 100 points to win, it was back to my 50-point save on the first map ...

28 minutes on the video. I'm gradually improving though it's often a two steps forward, one step back deal. 300 trains is a lot ... but it would get much, much higher. By now I was certain they were getting faster. Compare the speed here to that of the trains at the start (6-7 minute video mark) if you wish; there's a definite difference and also some trains can go much faster than others, even passing those that were released first which can really screw up your planning. There's a lot of quick mental triage that goes on, trying to decide which switches you have time to change and which you don't, what to save, and what to let go the wrong stations, etc.
Another 100 trains later and I'm still in the upper 50s. One derailment causes another, and boom it's down to 42. Sigh. And it would get worse, all the way down into the 20s as I had a rash of bad decisions (mostly off-screen). At 34 minutes and change I hit 60 for the first time (530+ trains) and remark "I can't handle this speed." They were simply coming faster than I was able to make adjustments.

I did not give up though. Here you can see I'm in the upper 60s. Good example of the triage thing I was talking about -- a 4-train has just headed down, and I'm letting this 6 go, but switch the track over in time to grab the 7. Instant decisions on what you can take or leave. From here it takes the 7-train about six seconds to reach that main intersection, which means I have a fair bit less than that to open the block switch or leave things be. No time to discuss it in committee. In this case, as many others, there's no time to set the block on the other side - but by opening the path, I can at least give the train the chance to pick the 'correct' path and give myself an opportunity to gain from an RNG call. A 50-50 shot is better than no shot at all.
I hover around 70 for a while, and then start getting a good run of trains that all have lowish numbers, meaning that I don't have to adjust that first main intersection. One such series, 1-4-3-5-3, are all handled and push me over 80.

37:49 video. My apologies to the superstitious, but here I hit 85 for the first time. I would never go higher under no-pause protocol. There's a few examples of 80+ level play in the video before I cash it in, but basically the trains literally go fast enough that it's hard for me to read the numbers. The 'slow' ones take six seconds from entering at Station 0 to hitting that main intersection. Sometimes there will be 3-4 within that window ... and I'm just not that good of a mouse/keyboard warrior.
When focused and not doing anything particularly stupid, I bounce from 75-80 generally. I couldn't find any tactical improvements beyond a certain point ... and yeah. I hit 85 for the first time at about 3 hours of play -- after more than 5, I called it and just went with Pause control to finish it up. At that point - 45:13 video, 5:09 mission timer - I had 58 Score. Another train was lost putting me down to 56, but from that point on I didn't miss another one on the infernal Pause Protocol. Less than nine minutes on the mission timer, about double that real-time.
Next up, I'll leave thepenguin system for ShadowDragon7015, which I presume - though I haven't played them yet at press time so I'm not certain - will have some semblance of a return to 'normal' Creeper Worlding.